Follow on Bloglovin

Sunday, 24 February 2013

MUA Heaven and Earth palette


I'm a massive fan of neutral eyeshadows, so I've always been keen to try Urban Decay's naked palettes. But, with such a high price tag, I wasn't too sure if it was worth it. Luckily, I found the perfect alternative set of eyeshadows in the form of MUA'S heaven and earth palette. I've heard many good reviews of this product so recently asked for it as a christmas present. I was lucky to be given it and started using it straight away!! The colours all last throughout the day when wearing them and they're very highly pigmented and also have a slight sparkle to them. At only £4.00 in Superdrug, it's an absolute bargain for such lovely colours and the amount of use you get out of them.
Lj x
 

Friday, 22 February 2013

Barry M gelly nail effects

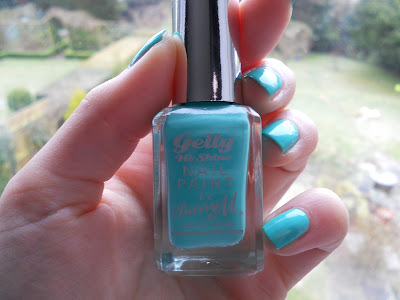
I love BarryM nail varnishes and, 99% of the time, when they have a new polish out, I'll want to try it! I've known about the Barry M gelly nail effects for a while now and only recently have got round to purchasing one. After my friend bought one and told me it was 'a bit thick and gloopy', I was slightly hesitant but I wandered into my local superdrug the other day and discovered that not only did they have new colours, they were also on a deal!! After browsing through all the many shades, I decided on Greenberry and tried it out the next day.

 
The colour of Greenberry is a greeny/bluey colour which is slightly turquoise. It comes in the normal-shaped BarryM packaging but unlike the standard colours, it has a shiny silver lid. As I said earlier, the gelly nail effects come in many colours and these are; plum, blackberry, watermelon, blood orange, blueberry, prickly pear, satsuma, grapefruit, pomegranate, lychee, dragon fruit, greenberry and papaya. The effect promises 'an extra glossy finish' and I really do think it does what it says on the bottle. If too much nail polish is applied to the brush, it does end up spreading all over your nail so I think 2 thin layers is enough. With this effect, I don't think a top coat is needed because it's so glossy but if you want to make it last longer, I'd use one. Overall, I think it's a really nice effect and comes in lots of lovely colours so is definitley worth the slightly higher price tag than the standard polishes. I think I will definitley purchase another colour in the future and look forward to seeing if it stays chip-free over the week!!
Lj x


Thursday, 21 February 2013

Coming soon...

As you can probably tell, I'm very new to blogging so am still getting to grips with finding time to post things and working out how to use everything on the site!! I am hoping to be able to post a small review tomorrow though so keep an eye out!! Lj x

Tuesday, 19 February 2013

How to... Newspaper nails!!

After seeing these newspaper effect nails all over youtube, I've been inspired to try them myself!! I got the method from the youtuber 'Dollybowbow' and I'm extremley pleased with the overall result!! Here's how I did them:
1) Firstly, I cleaned my nails of any excess polish using nail varnish remover and a cotton pad.
2) Once free from polish, I used 2 layers of BarryM strawberry ice cream nail varnish (or any pale/nude nail varnish) as a bottom coat.
3) After waiting for them to fully dry for 10-15 minutes, I cut out small squares of newspaper, big enough to fit over my nails.
4) I poured rubbing alcohol (or vodka) into a small shallow bowl and dipped one nail into it.
5) I then pressed one of the newspaper squares onto the rubbing-alcohol dipped nail and continued to press hard for 30-40 seconds.
6) Once I felt the writing had been fully transferred, I peeled the newspaper off and continued this for the rest of my nails.
7) Lastly, I painted my nails with a clear top coat to ensure it lasts longer.

I really love the effect the newspaper gives although one of the downsides is that it does start to fade very quickly, but I think this just adds to the look!!
 
Lj x